 The Scan Frequencies menu option allows you to create "banks" of scan frequencies without filling up the memory locations in your rig. You can scan the Quick Save or Favourites and Other frequencies. The frequencies are saved on the computer itself and sent individually to the rig as required.
The FT-847, for example, has some 80 memories for storing favourite frequencies from any band. If you use the rig to scan and have stored frequencies from a number of bands, scanning will be accompanied by much relay activity as different bands are switched as required. You cannot restrict scanning to one band and avoid accelerated relay wear unless you go through and lock out the individual memories of the unwanted bands. HRD allows you to set banks of frequencies and then you can choose them at will.
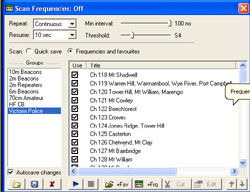
The Scan Frequencies window lists current banks of frequencies with a number of operating controls that will affect how the scan is performed. Creating the banks will be covered later.
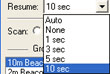 Resume: - This sets the scan resumption conditions after stopping on an occupied frequency. The options are Auto, None, 1, 3, 5 or 10 seconds. My FT-847 doesn't like the Auto setting and goes a little crazy on resumption by scanning really fast. Must try and find out why.
The Groups listing is a list of banks of frequencies that have been defined. The individual frequencies in the banks are shown to the right with checkboxes. The checkboxes need to be checked to include the individual frequencies in the scan. They are normally checked when created but can be unchecked to temporarily bypass them without having to remove them from the group.
Autosave Changes: - Check this box to automatically save any changes as they are made. You can change them later if you make a mistake.
There are several buttons in a row at the bottom of the Scan Frequencies window.
Autosave Changes: - Check this box to automatically save any changes as they are made. You can change them later if you make a mistake.
There are several buttons in a row at the bottom of the Scan Frequencies window.
See Add Favourite or Add current radio frequency buttons for frequency input.