
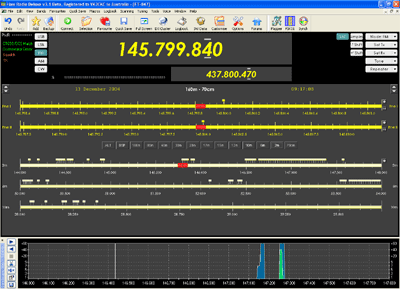
 There are a lot of features available from this main window. Along with frequency and band displays, the image at left also shows the band scope display introduced in Version 3.1. Tooltips are available for many of the displayed buttons and indicators. Just place the mouse cursor on a button or indicator and if there is a tooltip it will become visible.
Main Program Display - There are two VFOs displayed. The main VFO (VFO A) is displaying 145.799.840Hz and the sub-VFO (VFO B) is displaying 437.800.470Hz. The program's ability to display, or even access, a second VFO depends on whether the connected radio supports it. If it's not possible, it won't be there. The Yaesu FT-847, for example, must have Satellite Mode enabled in order to access the second VFO. It is simply not accessible in normal mode.
There are a number of ways to change frequency.
 This image shows a horizontal mark above and below the 6. If you click on the mark above, the number will increment. If you click on the mark below, it will decrement. You can also increment or decrement by pointing the mouse to the required digit and rotating the mouse wheel. This is available for all digits in the frequency display.
 The # symbol will be displayed after right clicking in the frequency display area and selecting a tuning increment. If you click on the mark above the #, the frequency will increment by the chosen step. If you click on the mark below, it will decrement. The current tuning step is displayed beneath the frequency.
Right clicking in the frequency display area not only brings up tuning steps but if tuning steps are currently selected, a Disable option will turn the facility off and the # symbol will disappear. There is also the option of rounding the tuning to an exact multiple of the step size.
 Fine I and Fine II sliders - The tuned frequency is 7.109.970MHz and this is shown by the two red slider buttons. Dragging either of the sliders to the right or left will change the tuned frequency. The sliders will spring back when the mouse is released. The lower, or Fine II slider can be displayed or hidden at will by right clicking, choosing tuning range and either checking or unchecking Show Fine II. This will allow more room for the tuning ranges if Fine II is not required.
Positioning the mouse pointer on any of the Fine Tune sliders or any of the Band sliders and rotating the mouse wheel will also cause the frequency to change.
If you have Out of Band sounds enabled, you will hear the appropriate indication if you move the sliders past the band edge.
The band indicators beneath the sliders will update in sympathy with the band segment selector buttons.
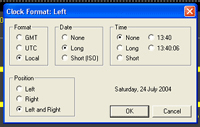 Clock and Date Display - If you right click on the Date or Time display you will be presented with a window of options for modifying the format of the date and time as well as the position in which it will be displayed on the screen.
The program takes its time information from your computer. It is essential that you have the correct time and time zone set up.
Band Title Display - If you left click on the band title display (beneath frequency) you will be presented with a small band selection window from which you can choose another band layout.
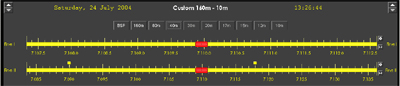
Sliders and Markers - The sliders in the main band display can be dragged to change frequency. The frequency change can be rather course but is handy for large frequency changes.
 The small square indicators above the band lines are Favourite frequency marker indicators. A different colour is available for Quick Save frequencies. Placing the cursor over the indicator will result in an explanation of the frequency as shown.
 The buttons displayed in the image at left are used for the selection or operation of various functions on the transceiver. Their operation is really obvious from the names of the buttons themselves. Not all functions in the program are available for all radios that may be connected. Some are radio specific.
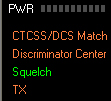 Status Window - The status window display will depend on information that is available from the connected radio. The indications are straight forward and the colours can be changed in Program Options from the Tools menu.
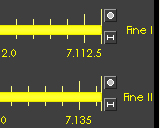 Fine I and Fine II Tuning - There are two selectable buttons at the right end of the Fine I and Fine II bandspread ranges. The topmost button is used to set the mouse wheel step size and the lower one is used to set the bandspread range. The lower one is also used to provide a choice of whether to display the Fine II range. A right click on either control will display a Tuning Range or Wheel Step choice menu.
The Fine II range provides a coarser control than the Fine I range.
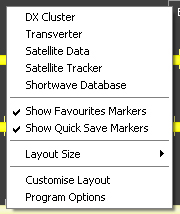 Right Click - This multi-choice window can be displayed by right clicking in virtually any clear area of the screen. See other sections for details of presented options.