Before you can use Ham Radio Deluxe to control your transceiver, you need to give due consideration as to how it was designed to interface with the computer and this can be confusing for newcomers. The main program sends coded control commands to the transceiver and receives information back from it. Only commands provided by the transceiver manufacturer are available for the program to use.
If you want to use PSK31 Deluxe as well, two audio connections are also required. Received audio from the transceiver needs to be routed to the soundcard and transmit audio from the soundcard needs to be routed to the transceiver. Most rigs these days will have special inputs and outputs for these functions. Read your manual to find out how it should be done.
Additional explanation can be found by downloading the Interfaces.pdf file which is a basic guide to CAT and Audio interfacing.
The most common types of connection are:
1. ICOM CI-V interface which has a serial port (RS-232) connection to the computer, usually with a DB9 connector, a level converter, and a stereo 3.5mm connector to the transceiver.
2. RS-232 cable between the computer and the transceiver - with or without a level converter.
There are a number of variations on the RS-232 connection. The variations will generally be in whether a level converter is necessary and whether a straight through or NULL Modem (or crossover) cable is required. For example, the manual for the Yaesu VR-5000 receiver specifies the crossover type of cable for cloning (copying the digital setup of one unit to another identical unit) and the straight through cable for receiver control. If it's not right, it won't work.
Straight Through Cable - Each pin is connected to a pin of the same number at the opposite end.
NULL Modem Cable - Pins 2 and 3 at one end are connected to pins 3 and 2 (respectively) at the other end. Usually, only pins 2, 3 and 5 are used.
If you build up a level converter box, ensure that the required pin relationship between one end of the cable and the other is preserved.
There are no hard and fast rules. There are many sources of RS-232 information on the Internet. Check your manual to find out exactly what your setup requires and get it right.
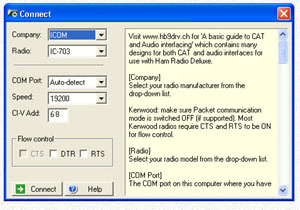 On first start, Ham Radio Deluxe will display a setup window with a number of selectable options and parameters. Explanatory text is provided but here is a general explanation of the options.
Company - Select the manufacturer of your radio. Standard choices are Elecraft, ICOM, Kenwood, Ten-Tec and Yaesu.
Demo-o-Matic® - Choosing the Dem-o-Matic® company will provide a selection from K2, Orion, TS-2000, TS-480 and TS-570 demonstration radios. Can be used for club demos and explorations without having to connect a radio.
Radio - Choose a model from the comprehensive drop down list of supported models from the company chosen above.
COM Port - The drop down list provides choices of Auto Detect, COM 1 and COM 2.
Speed - The choices presented here will depend on your radio choice above. If your radio does not support Auto Detect, you will have to choose a matching speed for the current radio setting.
CI-V - This is only used for ICOM radio interfaces.
CTS - Enables CTS which is required for Kenwood models.
DTR - Enables DTR line when the COM port is opened if required - usually for powering and interface cable.
RTS - Enables RTS line when the COM port is opened if required - usually for powering an interface cable.
Connect - Opens the chosen COM port and communicates with the radio to provide control.
Help - Text assistance for setting up the options in the window.
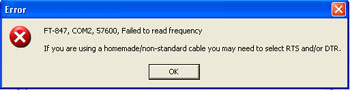 Turn the radio on first and then click Connect. You should be rewarded with the Ham Radio Deluxe main program display. If you see this error message at any time, it means the transceiver and the computer are not understanding each other because you haven't got the connection and setup right.